When I first got into music production, I remember feeling overwhelmed by cables. USB cables, instrument cables, XLR cables – they all seemed to blur together. But MIDI cables always stood out as something unique. At first glance, they look similar to other audio cables. They’ve got the same 5-pin design on each end that connects to MIDI In and Out jacks on your equipment. But MIDI itself is just a communication protocol – a way for devices to talk to each other.
So these cables aren’t carrying any actual audio. Instead, they transmit data and instructions: which note to play, when a sound starts or stops, cues for lighting systems, that kind of thing. Up to 16 channels of this control information can flow through one MIDI cable. This allows you to connect the various gear in your studio setup into one integrated system.
For example, playing a keyboard can send note data over MIDI to trigger sounds on your synth module or computer. Hitting Play in your DAW can send tempo data over MIDI to synchronize your drum machine.
Without this vital communication link, your instruments and devices wouldn’t be able to work together so seamlessly. MIDI cables form the backbone of synchronization for any modern music rig. Sure, there are flashier pieces of gear out there. But even the fanciest synth would just be an isolated instrument without these unassuming cables patching everything together behind the scenes.
Also See: Best MIDI Controller for Ableton
Types of MIDI Cables – Popular MIDI Cables
The most common types of cables used to transmit MIDI data are:
1. 5-Pin DIN MIDI Cable
This is the original and still the most widely compatible type of MIDI cabling. It uses 5-pin DIN connectors on each end, with the pins arranged in a semicircle pattern. DIN cables have been the standard for connecting MIDI gear since the inception of the MIDI specification back in 1983. They can transmit 16 channels of MIDI messages in one direction, from the MIDI out of one device to the MIDI in another.
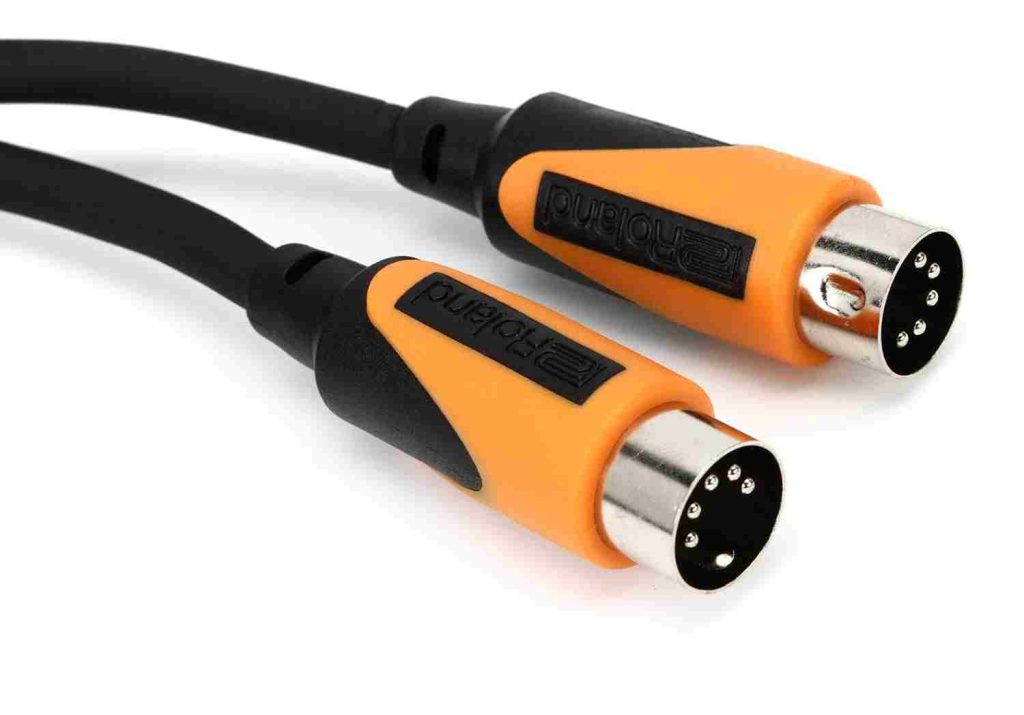
While reliable, DIN cables are limited by their unidirectional data flow. They also transmit data slower compared to high-speed options like USB. But DIN cables work with virtually all MIDI instruments and are a tried and tested way to connect devices. DIN cables use an asynchronous serial protocol to transmit data.
The cables contain a pair of wires that form a current loop circuit. This allows for cable lengths up to 15 meters without signal degradation. The 5-pin DIN connector includes pins for the current loop, ground, and reference voltage. Two pins are unused. The MIDI data is encoded using 8-bit words transmitted at 31.25 kbps. This contains a start bit, 8 data bits, and a stop bit.
This 5-Pin MIDI cable connection is suitable when there is a huge distance and requires a long cable connection like performing LIVE on stage or big studio setup because there is less latency up to 15 meters without any signal degradation.
Also See: Best MIDI Controllers
2. USB MIDI Cable
As computer-based music production became prominent, USB MIDI cables allowed direct communication between computers, tablets, smartphones, and MIDI devices. USB can transmit data much faster compared to DIN cables. USB cables also add the benefit of bidirectional data transmission. This allows connected gear to both send and receive MIDI messages. Most of the MIDI controller comes with USB Type-B to USB Type-A cable where USB Type-B is connected to MIDI Controller and other end, that is USB Type-A, is connected to computer/laptop’s USB port.

With class-compliant USB MIDI interfaces, no special drivers are required. USB cables are convenient for use with computers, but lack compatibility with some legacy MIDI hardware. USB MIDI cables utilize the USB bulk transfer protocol. This allows high bandwidth MIDI data transfer compared to DIN cables, which helps reduce latency. USB is also plug-and-play on modern operating systems.
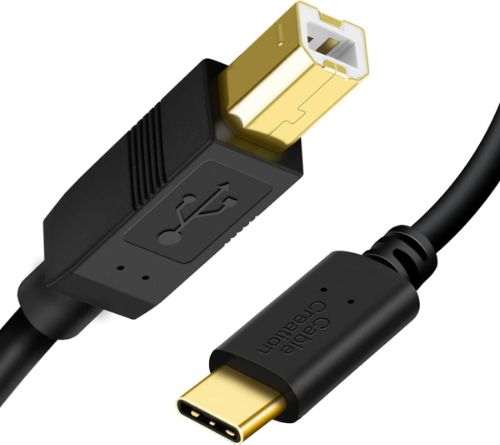
In case your laptop or PC only has a USB Type-C port, you can additionally get a USB Type-B to USB Type-C cable which is easily available.
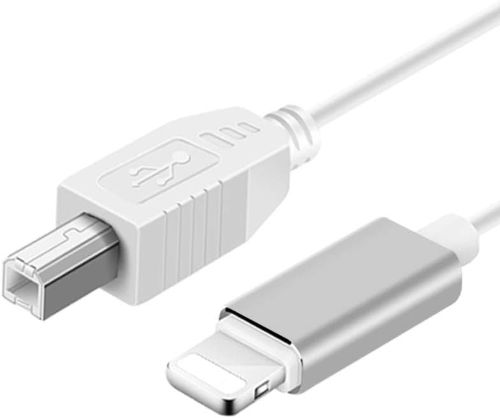
For iPad and iPhone users who want to connect their MIDI controller to an iPad or iPhone, there is a USB Type-B to Lightning cable available in the market that opens the door to connect any MIDI Controller to iPad and iPhone.
However, some USB-MIDI interfaces may require proprietary drivers for full functionality. The USB Implementers Forum provides standard class specifications for MIDI devices to improve interoperability.
| Specification | Speed | Channels | Directionality | Compatibility |
|---|---|---|---|---|
| DIN | 31.25 kbps | 16 | Unidirectional | Universal |
| USB | 12 Mbps+ | 16+ | Bidirectional | Hardware dependent |
3. 5-Pin MIDI to USB Cable
This type of cable converts the 5-pin MIDI signal to USB on one end. It allows connecting MIDI devices like keyboards and controllers to computers via USB while still using the 5-pin MIDI ports on the instrument side. These cables provide a useful bridge between classic MIDI gear and modern computers.

The 5-pin end connects to the MIDI out port of the instrument while the USB end plugs into the computer. This facilitates easy data transfer and MIDI communication between the two devices. Some MIDI to USB cables may be class compliant which means no drivers are required. Others may need a driver installed for proper functionality.
5-pin MIDI to USB cables are available in various lengths. Short 1-foot cables are good for stationary studio setups while longer 10+ foot cables allow more flexibility in placement. Braided nylon sleeves improve durability for touring musicians. Premium gold-plated connectors also resist corrosion over time. Overall, MIDI to USB cables opens up computer integration options without modifying vintage MIDI instruments.
Also See: Best 88 Key MIDI Controller
4. FireWire MIDI Cable
FireWire cables represent an alternative to USB for connecting MIDI interfaces at fast speeds. They offer comparable plug-and-play connectivity like USB. However, FireWire is not as widely adopted today. While it remains an option, USB has largely overtaken FireWire as the high-speed computer connection for MIDI interfaces.
The IEEE 1394 “FireWire” specification provides high-speed serial data transfer that can support MIDI interfaces well. Like with USB, FireWire’s two-way communication removes the directionality limitations of DIN cables. FireWire also offers guaranteed latency by reserving bandwidth for MIDI data. However, direct motherboard integration, widespread adoption, and backward compatibility have led USB to surpass FireWire in most applications.
Wireless MIDI Connections – Bluetooth MIDI
Recent wireless MIDI solutions allow MIDI gear to connect without cables using radio, Bluetooth, or Wi-Fi communication. Wireless MIDI systems provide cable-free convenience and flexible stage setups for live performance. Reliability can vary between solutions though. Latency may also be introduced, which can impact timing. Careful selection is important for mission-critical wireless MIDI needs.
Wireless MIDI connectivity introduces new flexibility into MIDI rigs by removing location-dependent cabling. Common wireless protocols used include Bluetooth, Wi-Fi, and proprietary RF solutions. Bluetooth MIDI has become widely supported for short-range cable replacements between devices.
For longer ranges, dedicated wireless MIDI systems use robust 2.4 GHz transmission with optimized antennas and channel hopping to maintain stability. Reliability depends on the implementation – interference can disrupt signals, so mission-critical connections may still require cables.
How Can MIDI Cables Be Used?
MIDI cables serve several core functions in music setups:
1. Connecting Electronic Music Instruments & Gears
MIDI cables serve the crucial function of linking together musical devices to create integrated systems. Physically connecting a MIDI keyboard controller to a rackmount sound module allows the keyboard to directly play the module’s internal synthesizer engines.
Multiple cables can be chained to connect several MIDI gear components. This flexibility enables musicians to configure rigs with their choice of sound sources, processing, and performance controllers tailored to their needs. With electronic instruments no longer isolated, MIDI cables facilitate an interactive ecosystem where devices communicate to realize creative visions.
2. Sending and Receiving Musical Information
Beyond the physical connections, MIDI cables transmit critical performance data between equipment. Control messages like notes on/off, modulation signals, volume adjustments, and more shape the musical output of connected sound modules and instruments.
Timing signals maintain synchronization across drum machines, arpeggiators, and sequencers. This constant musical chatter enables nuanced control of expressive dynamics and tight rhythmic interplay within a MIDI setup.
Musicians harness real-time manipulation of these MIDI cues to sculpt the finer details of each device’s contribution. This communication workflow allows an ensemble of hardware from various manufacturers to function in unity.
3. Enabling Digital Devices to Communicate
Fundamentally, MIDI cables provide the communication framework that allows musical devices to detect each other and exchange compatible data. This standard MIDI protocol connects digital instruments across brands, allowing seamless integration into unified systems regardless of the make or model.
It is this reliable messaging capability that facilitates detailed musical control and precision timing that makes integrated MIDI music production possible.
Without MIDI connectivity, much of today’s environment of computer-based recording, automated live performances, and controller-based manipulation would not exist. MIDI cables enable the essential data transmission to bridge the gap between musical imagination and reality.
Overall, MIDI cables unlock the true power of electronic musical hardware by linking capabilities into interconnected wholes far greater than the sum of their parts. The communication highway they provide underpins nearly all modern electronic music production.
How to Use MIDI Cables?
Using MIDI cables to connect your music gear opens up creative possibilities, but does require understanding their directional data flow.
Connecting MIDI Cables to Devices
The first step is physically connecting your MIDI cables between compatible instruments and equipment. Line up the 5-pin DIN connectors and plug the cable ends into MIDI In and MIDI Out jacks. MIDI Out sends data, MIDI In receives it.
- For example, run a MIDI cable from the MIDI Out on your controller keyboard to the MIDI In on your desktop synth module. This lets you play the module’s sounds from your keyboard. Connect multiple MIDI devices in a “daisy chain” configuration using additional cables.
Setting Up MIDI Cables with Interfaces
To connect MIDI gear to a computer, use a MIDI interface with MIDI and USB jacks. For instance, run a MIDI cable from your keyboard’s MIDI Out to the interface’s MIDI In. Then use a USB cable from the interface to your computer.
MIDI keyboard controllers combine an interface with piano-style keys for playing and controlling software instruments. Connect the controller’s USB port directly to your computer to both play and communicate MIDI data.
Understanding the Direction of Data Flow
5-Pin MIDI cables transmit data one way only. So a device’s MIDI Out connects to another device’s MIDI In. Be aware of the direction data needs to travel, often from a controller to the destination sound module. For two-way communication, use a USB MIDI interface.
Special MIDI Thru boxes can merge and route multiple MIDI cable connections. Connecting MIDI cables forms a vital link for musical devices to exchange MIDI performance instructions and synchronization with each other. This connectivity empowers the deep integration of digital instruments into cohesive systems.
Why Use MIDI Cables?
MIDI cables provide a range of benefits that explain their enduring popularity for music production, performance, and education applications:
Benefits of Using MIDI Cables
While wireless MIDI systems exist, MIDI cables offer reliability and near-universal compatibility with electronic instruments at low cost. The simple but versatile MIDI protocol ensures support across brands, while the cables handle high-bandwidth musical data traffic effectively.
| Feature | Benefit |
|---|---|
| Reliability | Consistent performance for critical applications |
| Compatibility | Works with nearly all MIDI devices |
| Low Cost | Affordable connectivity even on modest budgets |
| High Data Bandwidth | No audio dropouts during dense MIDI traffic |
In the studio, MIDI cables enable detailed sequencing and synchronization between hardware sound modules, controllers, computers, and MIDI instruments like keyboard workstations. This fosters rich interplay and nuanced editing.
Live performers depend on MIDI cables for real-time control, patch changes, and backup track triggering. Bidirectional communication empowers bandleaders to shape live arrangements on the fly using centralized MIDI rigs.
In instructional settings, MIDI cables facilitate teacher oversight of student workstations, remote lesson monitoring, and collaborative learning environments leveraging MIDI networks.
Overall, MIDI cables unlock seamless musical system integration using a time-tested standard. Their plug-and-play connectivity continues to enable creativity across ability levels, genres, and industry roles. Check out our website for MIDI Controller recommendations and knowledge guides.
FAQs
What is the maximum length for a MIDI cable?
The MIDI specification allows for a maximum cable length of 15 meters or around 50 feet. Longer runs can cause deterioration of the MIDI signal. For very long cable runs, using MIDI interfaces with optical isolation helps preserve signal integrity.
Can I use an instrument cable or other audio cable as a MIDI cable?
No, you should not use instrument cables like guitar cables or XLR cables as a substitute for MIDI cables. MIDI cables use specialized 5-pin wiring and require shielded twisted pair conductors that carry low-voltage digital signals. Using the wrong cable can cause issues with MIDI communication.
How do I wire or solder a MIDI cable correctly?
Refer to the MIDI specification wiring: Pins 4 and 5 carry the MIDI signal over a shielded twisted pair cable. Pins 1, 2, and 3 are unused. Connect pin 2 to the cable shield. Use 5-pin DIN male connectors on both ends. Ensure proper conductor twist rate and shielding for reliable data transmission.
My MIDI cable is not working. How do I test and troubleshoot it?
Try different cables and devices to isolate the issue. Check that devices are set to the correct MIDI channel. Ensure firm cable connections at both ends. Test cable continuity on pins 4 and 5. Look for cable damage. Use MIDI monitoring software to check if MIDI messages are being transmitted.
What is the purpose of the unused pins (1, 2, 3) on a MIDI cable?
The unused pins on a MIDI cable are there to allow compatibility with potential future standards. They also provide extra physical support for the cable connector. It’s recommended not to connect them to anything.
Can I split a MIDI signal between multiple devices?
Yes, you can split a MIDI signal to feed multiple devices using a MIDI thru box or MIDI splitter. These devices take a single MIDI input and split it into multiple isolated outputs that allow connecting several MIDI instruments.
Is there a limit to how many MIDI devices I can chain together?
The MIDI specification does not mandate a limit. However, as more devices are chained, latency and potential for signal degradation increases. As a rule of thumb, chaining more than 8-10 devices can cause issues. Using multiple mergers and thru boxes helps extend this limit.
Can I safely use a MIDI cable for other purposes?
No, you should not use a MIDI cable for any other purpose besides MIDI. The cables use specialized twisted pair wiring to carry critical low-voltage signals. Using them for audio, DC power, or modifications can damage equipment.
How do I know if my MIDI cables need to be replaced?
If you face issues like intermittent MIDI dropouts, double-triggering notes, or no MIDI communication at all, it likely indicates a bad MIDI cable. Try swapping the cable to isolate the problem. Inspect cables for loose connectors, kinks, cuts, or corrosion.
What cable gauge should I use when making custom MIDI cables?
The MIDI specification recommends using 22 to 24 AWG wires for MIDI cables under 50 ft. Heavier gauges like 22 AWG help reduce voltage drop on longer runs. Ensure proper shielding, 120 ohms impedance, and minimum 60 pF/ft capacitance.







pemain perlu mengikuti beberapa langkah sederhana. Berikut adalah panduan singkat untuk memulai permainan:
akun slot gacor
hatori 77
slot bet 400
slot bet 200
slot bet 200
hatori 77
slot gacor
mahjong bet 200
hatori 77
slot gacor
akun slot gacor